Full Yes 82430TX Manual
CONTENTS
Chapter 1 ……………………………………………………………… 1
1. Introduction ………………………………………………………….…. 1
2. Specifications ….…………………………………………….………….. 2
Chapter 2 Hardware Configuration…………..………… 3
1. AT Layout Placement …………………..………………………….…… 3
2. ATX layout Placement ……………………………..…………….…….. 4
3. Jumper Setting ………………………………………………………….. 5
Flash ROM Type Voltage ………………………………………………. 5
DIMM Modules Voltage ……………………………………..………… 5
CMOS Clear Function Select …………………………………………… 5
CPU Clock Select …………………………………………………….… 5
CPU Vcore Frequency Ratio …………………………………….….…. 6
CPU Vcore Voltage Select ………………………………………….…. 6
Others Jumper Setting ………………………………………………….. 6
Connectors ………………………………………………………….….. 7
USB Connectors ………………………………………………….……. 7
FAN Device Connector …………………………………………….…... 8
CPU Quick Index 1 …………………..……………………………….…8
CPU Quick Index 2 …………………..……………………………….…9
Chapter 3 BIOS Setup……………………………………….…10
Section 1 Main Menu …………………………………………….…….10
Section 2 Standard CMOS Setup ………………………………………12
Section 3 BIOS Features Setup ……………………………………….. 13
Section 4 Supervisor/User Password Setting …………………………..15
Section 5 Chipset Setup/Integrated Peripherals Feature Setup .………...16
Section 6 Integrated Peripherals ………………………………………..19
Section 7 Power Management Setup …………………………………...22
Section 8 PnP/PCI Configuration Setup ………………………………..25
Section 9 Low-Level Format Utility …………………………….……...26
Chapter 1
1.Introduction
The 82430TX PCI consists of the TX System Controller (MTXC) and PCI ISA IDE Xcelerator (PIIX4). The PCIset forms a Host-to-PCI bridge and provides the second level cache control and a full function 64-bit data path to main memory. The MTXC integrates the cache and main memory DRAM control function and provides bus control to transfers between the CPU, cache, main memory, and the PCI Bus. The second level (L2) cache controller supports a write-back cache policy for cache size of 256 Kbytes and 512 Kbytes. Using the snoop ahead feature, the MTXC allows PCI masters to achieve full PCI bandwidth. For increased system performance, the MTXC integrates posted write and read prefetch buffers. The Intel 430TX PCIset integrates many Power Management features that will enable the system to save power whenever the system resources become idle.
The PCI ISA IDE Xcelerator (PIIX4) is a multi-function PCI device implementing a Universal Serial Bus host/hub function, and an Enhanced Power Management function. As a PCI-to-ISA bridge, the PIIX4 integrates many common I/O function found in ISA-based PC system—a seven channel DMA Controller, two 82C59 Interrupt Controllers, an 8254 Time/Counter, and a Real Time Clock. In addition to Compatible transfers, each DMA channel supports Type F transfers. The PIIX4 also contains full support for both PC/PCI and Distributed DMA protocols implementing PCI based DMA. The Interrupt Controller has Edge or Level sensitive Programmable inputs and fully supports the use of an external I/O Advanced Programmable Interrupt Controller (APIC) and Serial Interrupts. Chip select decoding is provides for BIOS, Real Time Clock, Keyboard Controller, second external Microcontroller, as well as 2 Programmable Chip Selects. The PIIX4 provides full Plug and Play compatibility. The PIIX4 can be configured as a Subtractive Decode bridge or as a Positive Decode bridge.
The PIIX4 supports two IDE connectors for up to four IDE device providing an interface for IDE hard disks and CDROMs. Up to four IDE device can be support in Bus Master mode. The PIIX4 contains support for "Ultra 33" synchronous DMA compatible devices.
PIIX4 contains a Universal Serial Bus (USB) Host Controller that is Universal Host Controller Interface (UHCI) compatible. The Host Controller’s root hub has two programmable USB ports.
The PIIX4 support Enhanced Power Management, including full Clock Control, Device Management for up to 14 devices, and Suspend and Resume logic with Power On Suspend. It fully support Operating System Directed Power Management via the Advanced Configuration and Power Interface (ACPI) specification. The PIIX4 integrates both a System Management Bus (SMBus) Host and Slave interface for communication with other Power Management peripherals.
2.Specifications
Intel 82430TX PCIsetsymbol 212 \f "Symbol" \s 10Ô}chipset
Support Intel Pentium ,MMX CPUs, Cyrix 6x86, 6x86L, and M2 CPUs, AMD K5, and K6 CPUs, and IDT C6 CPUs.
Support full range CPU’s frequency, from 90MHz to 233MHz
256KB or 512KB Pipeline Burst SRAM on board
Support Both Fast Page Mode and Extended Data Output (EDO) DRAM modules
Uses 72-pin SIMM modules X 4 and 168-pin DIMM modules X 2 auto banking in multiple configuration, the maximum on board MEMORY BANK is two.
Up to 256MB
Support SDRAM/EDO DRAM/FPM DRAM use 168-pin DIMM modules
4X PCI Local Bus slots, and 4X 16Bits ISA Bus slots
Up to four IDE device can be support in Bus Master mode
Support for "Ultra 33" synchronous DMA compatible device
Support the Universal Serial Bus (USB)
Support LS-120MB floppy disk
Support Microprocessor Thermal Management (Temperature Controller/ Fan Controller/ Melody)
Support ACPI(Advanced Configuration and Power Interface)
AWARD BIOS (Boot Block Flash ROM), Support "Plug and Play" function
Remote Ring On ( Modem on line)
Software Power-Off (Must be ATX Power Supply)
Dual Function Switch Button (Power Management Setup)
Chapter 2
Hardware Configuration
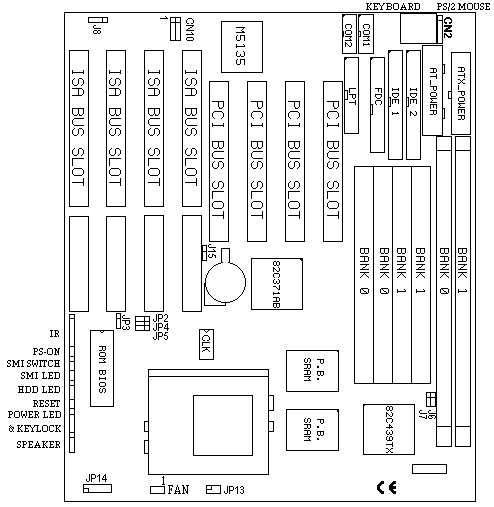
1. AT Layout placement(Intel 82430TX-A)
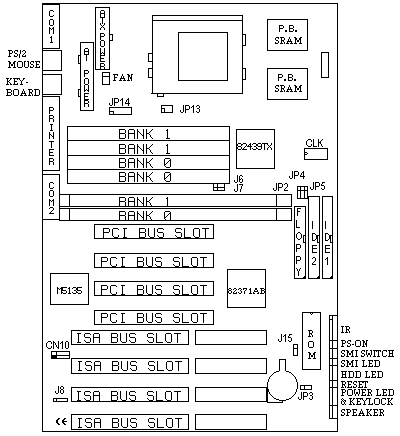
ATX Layout placement(Intel 82430TX-B)
3. Jumper Setting (* : default)
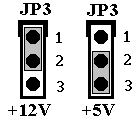
symbol 129 \f "Wingdings" \s 12}. JP3 Flash ROM Type Voltage (Factory)
| +5V | +12V |
| 2 - 3 | 1 - 2 |
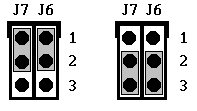
symbol 130 \f "Wingdings" \s 12‚}. J6,J7 DIMM Modules Voltage
| +5V | * +3.3V |
| 1 - 2 | 2 - 3 |
symbol 131 \f "Wingdings" \s 12ƒ}. J15 CMOS Clear Function Select
| * 1 - 2 | I Internal Battery |
| 2 - 3 | Clear CMOS RAM data |

Note: To clear CMOS setup memory if there has been any inappropriate operation incurring the system failure
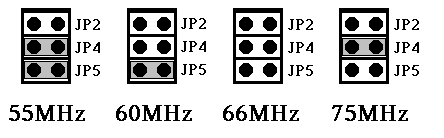
symbol 132 \f "Wingdings" \s 12„}. CPU Clock Select
| Clock(MHz) | 55MHz | 60MHz | *66MHz | 75MHz |
| JP2 | OFF | OFF | OFF | OFF |
| JP4 | ON | OFF | OFF | ON |
| JP5 | ON | ON | OFF | OFF |
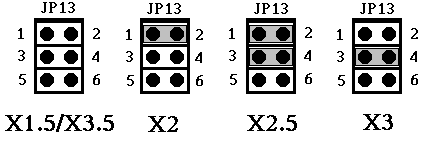
symbol 133 \f "Wingdings" \s 12…}.CPU Vcore Frequency Ratio
| Frequency Ratio | X1.5/X3.5 | *X2 | X2.5 | X3 |
| JP13 | OFF | 1 - 2 | 1-2, 3-4 | 3 - 4 |
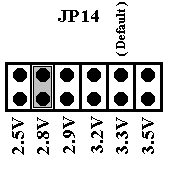
symbol 134 \f "Wingdings" \s 12†}. CPU Vcore Voltage Select
| CPU Voltage | JP14 |
| 2.5V | 1 - 2 |
| 2.8V | 3 - 4 |
| 2.9V | 5 - 6 |
| 3.2V | 7 - 8 |
| 3.3V | * 9 - 10 |
| 3.5V | 11 - 12 |
symbol 135 \f "Wingdings" \s 12‡}. Others Jumper Setting
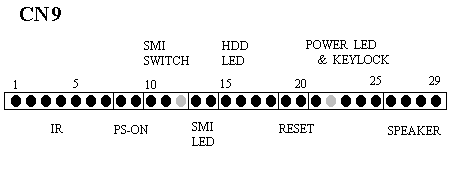
| Pin No. | Assignment | Function | Pin No. | Assignment | Function |
| 1 | IRRX |
IR | 16 | HDD LED - | HDD LED |
| 2 | GND | 17 | HDD LED - | ||
| 3 | IRTX | 18 | HDD LED + | ||
| 4 | +5V | 19 | GND | RESET BUTTON | |
| 5 | NC | 20 | RESET | ||
| 6 | +5V | 21 | PWR LED + | POWER LED & KEYLOCK | |
| 7 | GND | 22 | NC | ||
| 8 | SB3V | PS-ON | 23 | PWR LED - | |
| 9 | POWER-ON | 24 | KEYLOCK | ||
| 10 | GND | SMI SWITCH | 25 | GND | |
| 11 | EXTSMI | 26 | +5V | SPEAKER | |
| 12 | NC | 27 | NC | ||
| 13 | SMI LED + | SMI LED | 28 | NC | |
| 14 | SMI LED - | 29 | SPK OUT | ||
| 15 | HDD LED + |
Note 1 : "PS-ON" is connect POWER ON-OFF switch of the "ATX" Power Supply
symbol 136 \f "Wingdings" \s 12ˆ}. Connectors
| J1 | Connector of ATX Power Supply |
| J4 | Connector of AT Power Supply |
| CN2 | PS/2 Mouse |
| CN3 | Keyboard |
| CN1 | Serial Port 1 |
| CN5 | Serial Port 2 |
| CN4 | Parallel Port |
| CN6 | Ultra IDE 1 |
| CN7 | Ultra IDE 2 |
| CN8 | Floppy Driver Port |
symbol 137 \f "Wingdings" \s 12‰}. CN10 Universal Serial Bus (USB) Connectors
Pin1 : +5V Pin2 : +5V
Pin3 : USBP1- Pin4 : USBP0-
Pin5 : USBP1+ Pin6 : USBP0+
Pin7 : GND Pin8 : GND
Pin9 : GND Pin10: GND
symbol 138 \f "Wingdings" \s 12Š}. FAN FAN Device Connector

Pin1 : GND
Pin2 : Fan Voltage (+12V)
Pin3 : GND
DRAM Installation :
* SIMM 1 & 2(BANK0) & DIMM5(BANK0) can not install simultaneously.
** SIMM 3 & 4(BANK1) & DIMM6(BANK1) can not install simultaneously.
symbol 243 \f "Monotype Sorts" \s 12ó}symbol 243 \f "Monotype Sorts" \s 12ó}symbol 243 \f "Monotype Sorts" \s 12ó}. CPU Quick Index 1.
INTEL CPU.
| CPU TYPE | PRINTING | MUL/MHz | JP13 | JP2 | JP4 | JP5 |
| Pentium | 90 | 1.5/60 | OFF | OFF | OFF | ON |
| Pentium | 100 | 1.5/66 | OFF | OFF | OFF | OFF |
| Pentium | 120 | 2.0/60 | 1-2 | OFF | OFF | ON |
| Pentium | 133 | 2.0/66 | 1-2 | OFF | OFF | OFF |
| Pentium | 150 | 2.5/60 | 1-2,3-4 | OFF | OFF | ON |
| Pentium/MMX | 166 | 2.5/66 | 1-2,3-4 | OFF | OFF | OFF |
| Pentium/MMX | 200 | 3.0/66 | 3-4 | OFF | OFF | OFF |
| Pentium MMX | 233 | 3.5/66 | OFF | OFF | OFF | OFF |
AMD CPU.
| CPU TYPE | PRINTING | MUL/MHz | JP13 | JP2 | JP4 | JP5 |
| AMD-K5 | PR-90 | 1.5/60 | OFF | OFF | OFF | ON |
| AMD-K5 | PR-100 | 1.5/66 | OFF | OFF | OFF | OFF |
| AMD-K5 | PR-133 | 2.0/66 | 1-2 | OFF | OFF | OFF |
| AMD-K5/K6 | PR-166/PR2-166 | 2.5/66 | 1-2,3-4 | OFF | OFF | OFF |
| AMD-K6 | PR2-200 | 3.0/66 | 3-4 | OFF | OFF | OFF |
| AMD-K6 | PR2-233 | 3.5/66 | OFF | OFF | OFF | OFF |
Cyrix ( IBM ) 6x86/6x86L
| CPU TYPE | PRINTING | MUL/MHz | JP13 | JP2 | JP4 | JP5 |
| 6x86/6x86L | PR-133+ | 2.0/55 | 1-2 | OFF | ON | ON |
| 6x86/6x86L | PR-150+ | 2.0/60 | 1-2 | OFF | OFF | ON |
| 6x86/6x86L | PR-166+ | 2.0/66 | 1-2 | OFF | OFF | OFF |
| 6x86/6x86L | PR-200+ | 2.0/75 | 1-2 | OFF | ON | OFF |
symbol 243 \f "Monotype Sorts" \s 12ó}symbol 243 \f "Monotype Sorts" \s 12ó}symbol 243 \f "Monotype Sorts" \s 12ó}. CPU Quick Index 2.,
CPU Vcore Voltage Select
| CPU Voltage | JP14 |
| 2.5V | 1 - 2 |
| 2.8V | 3 - 4 |
| 2.9V | 5 - 6 |
| 3.2V | 7 - 8 |
| 3.3V | * 9 - 10 |
| 3.5V | 11 - 12 |
Note:
INTEL Pentium MMX/Cyrix 6x86L CPU Setting by 2.8V
AMD K6-166/200 Setting by 2.9V
AMD K6-233 Setting by3.2V
INTEL Pentium / AMD K5 CPU Setting 3.3V
AMD K5-166 Setting 3.52V
CYRIX 6x86 CPU Setting3.3V or 3.52V
Chapter 3
BIOS Setup
While the BIOS is in control, the Setup program can be activated in one of two ways:
By pressing <Del> immediately after turn on the system, or
by pressing the <Del> key when the following message appears briefly at the bottom of the screen during the POST (Power On Self Test).
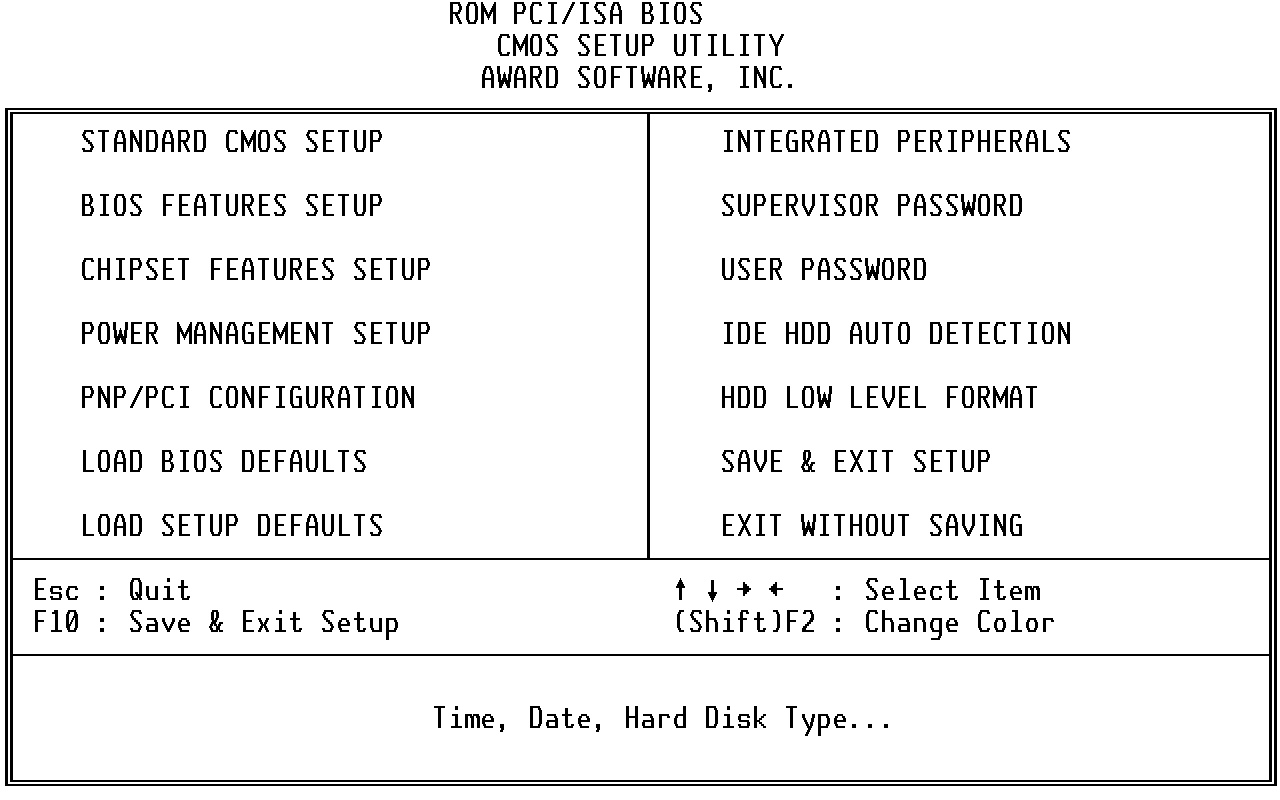
Section 1. Main Menu
This setup page includes all the items in a standard, AT-compatible BIOS.
This setup page includes all the items of Award special enhanced features.
Supervisor/ User Password Setting
Change, set, or disable password. It allows you to limit access to the system and Setup, or just to Setup.
This setup page includes all the items of chipset special features.
This entry only appears if your system supports Power Management, "Green PC", standards.
This entry appears if your system supports PNP / PCI.
The BIOS defaults have been set by the manufacturer and represent settings which provide the minimum requirements for your system to operate.
The chipset defaults are settings which provide for maximum system performance. While Award has designed the custom BIOS to maximize performance, the manufacturer has the right to change these defaults to meet their needs.
This section page includes all the items of IDE hard drive and Programmed Input / Output features.
IDE HDD Auto Detection
Automatically detect and configure hard disk parameters. The Award BIOS includes this ability in the event you are uncertain of your hard disk parameters.
If supported by your system, this provides a hard disk low level format utility.
Save CMOS changes to CMOS and exit setup.
Abandon all CMOS changes and exit setup.
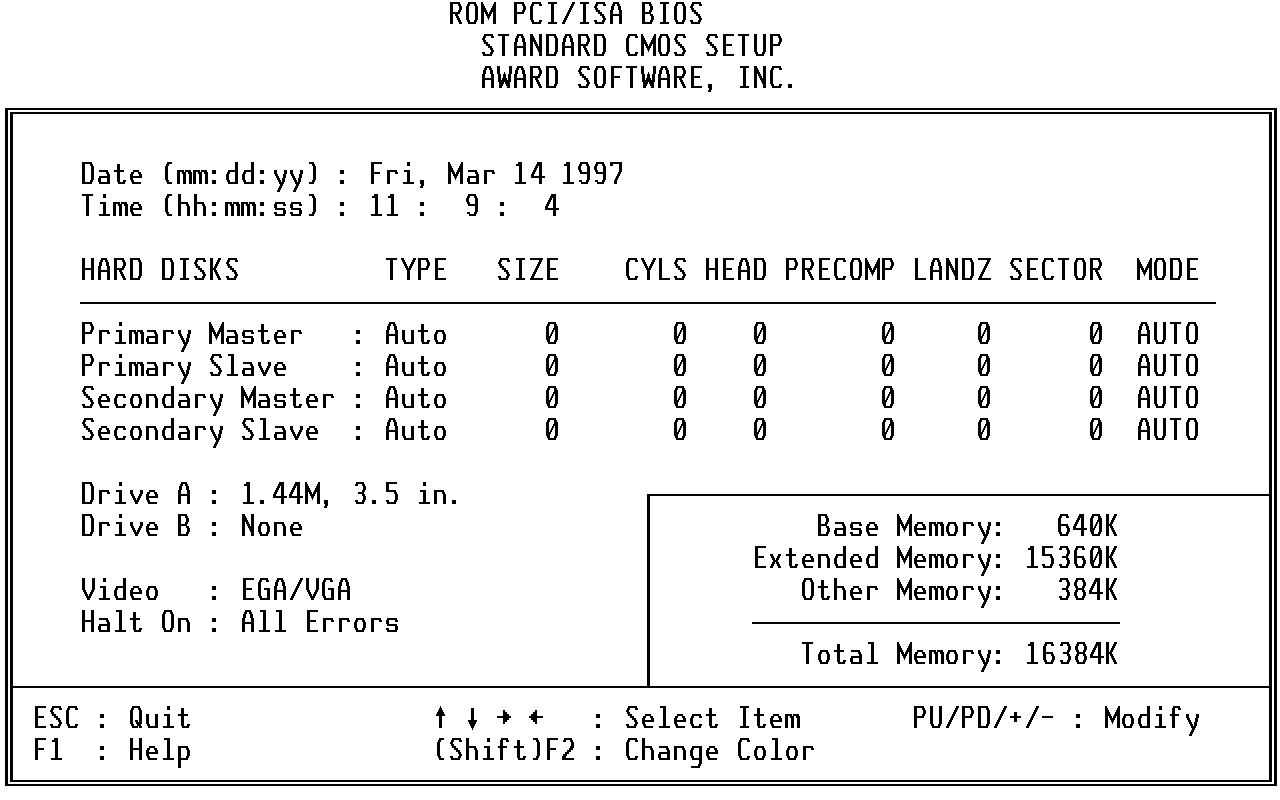
Section 2. Standard CMOS Setup
The date format is <day>, <date> <month> <year>.
The time format is <hour> <minute> <second>. The time is calculated based on the 24-hour military-time clock. For example, 1 p.m. is 13:00:00.
Primary Master/Primary Slave/Secondary Master/Secondary Slave
Press PgUp or PgDn to select a numbered hard disk type or type the number and press <Enter>. Note that the specifications of your drive must match with the drive table. The hard disk will not work properly if you enter improper information for this category. If your hard disk drive type is not matched or listed, you can use Type "User" to define your own drive type manually.
If you select Type "User", you will need to know the listed information. Enter the information directly from the keyboard and press <Enter>. This information should be included in the documentation from your hard disk vendor or the system manufacturer.
If the controller of HDD interface is ESDI, the selection shall be "Type 1".
If the controller of HDD interface is SCSI, the selection shall be "None".
If you select Type "Auto", BIOS will Auto-Detect the HDD & CD-ROM Drive at the POST stage and showing the IDE for HDD & CD-ROM Drive.
If a hard disk has not been installed select NONE and press <Enter>.
The category identifies the types of floppy disk drive A or drive B that have been installed in the computer.
Choose : None, 360K, 1.2M, 720K, 1.44M, 2.88M
The category selects the type of video adapter used for the primary system monitor. Although secondary monitors are supported, you do not have to select the type in Setup.
Choose : EGA/VGA, CGA40, CGA80, MONO
Halt On
The category determines whether the computer will stop if an error is detected during power up.
The category is display-only which is determined by POST (Power On Self Test) of the BIOS.

Section 3. BIOS Features Setup
When this item is enabled, the Award BIOS will monitor the boot sector and partition table of the hard disk drive for any attempt at modification. If an attempt is made, the BIOS will halt the system and the following error message will appear. Afterwards, if necessary, you will be able to run an anti-virus program to locate and remove the problem before any damage is done. (default: Disabled)
! WARNING ! Disk boot sector is to be modified Type "Y" to accept write or "N" to abort write Award Software, Inc. |
NOTE: Many disk diagnostic programs which attempt to access the boot sector table can cause the above warning message. If you will be running such a program, we recommend that you first disable Virus Protection beforehand.
CPU Internal Cache/External Cache
| Enabled | Enable cache (default) |
| Disabled | Disable cache |
| Enabled | Enable quick POST (default) |
| Disabled | Normal POST |
Choose : A,C,SCSI (default) C,A,SCSI C,CDROM,A
CDROM,C,A D,A,SCSI E,A,SCSI F,A,SCSI
SCSI,A,C SCSI,C,A C only LS/ZIP,C
This item allows you to determine whether enable the swap floppy drive or not. If enable, Floppy A: as B: and B: as A:
The choice: Enabled /Disabled(default).
During POST, BIOS will determine if the floppy disk drive installed is 40 or 80 tracks. 360K type is 40 tracks while 760K, 1.2M and 1.44M are all 80 tracks. (default: Enabled)
| On | Keypad is number keys (default) |
| Off | Keypad is arrow keys |
| High | Set the speed to high (default) |
| Low | Set the speed to low |
| Enabled | Enable typematic rate |
| Disabled | Disable typematic rate (default) |
| 6,8,10,..,30 | "n" characters per second (default:6) |
| 250,500,750,1000 | "n" msec (default:250) |
PS/2 Mouse Function Control
| Enabled | Enable PS/2 Mouse (default) |
| Disabled | Disable PS/2 Mouse |
| System | The system will not boot and access to Setup will be denied if the correct password is not entered at the prompt. |
| Setup | The system will boot, but access to Setup will be denied if the correct password is not entered at the prompt. (default) |
Note: To disable security, select PASSWORD SETTING at Main Menu and then you will be asked to enter password. Do not type anything and just press <Enter>, it will disable security. Once the security is disabled, the system will boot and you can enter Setup freely.
This item allows you to access the memory that over 64MB in OS/2.
The choice: Non-OS2 (default), OS2.
| Enabled | When PCI/VGA working with MPEG ISA/VESA VGA Card. |
| Disabled | When PCI/VGA not working with MPEG ISA/VESA VGA Card. (default) |
| Enabled | Video shadow is enabled (default) |
| Disabled | Video shadow is disabled |
C8000 - CBFFF Shadow/DC000 - DFFFF Shadow
| Enabled | Optional shadow is enabled |
| Disabled | Optional shadow is disabled (default) |
Assign IRQ For VGA
| Enabled | IRQ is enabled for VGA card |
| Disabled | IRQ is disabled for VGA card (default) |
Section 4. Supervisor/User
Password Setting
You can set either supervisor or user password, or both of then. The differences between are:
supervisor password : can enter and change the options of the setup menus.
user password : just can only enter but do not have the right to change
the options of the setup menus.
When you select this function, the following message will appear at the center of the screen to assist you in creating a password.
ENTER PASSWORD:
Type the password, up to eight characters in length, and press <Enter>. The password typed now will clear any previously entered password from CMOS memory. You will be asked to confirm the password. Type the password again and press <Enter>. You may also press <Esc> to abort the selection and not enter a password.
To disable a password, just press <Enter> when you are prompted to enter the password. A message will confirm the password will be disabled. Once the password is disabled, the system will boot and you can enter Setup freely.
PASSWORD DISABLED.
When a password has been enabled, you will be prompted to enter it every time you try to enter Setup. This prevents an unauthorized person from changing any part of your system configuration.
Additionally, when a password is enabled, you can also require the BIOS to request a password every time your system is rebooted. This would prevent unauthorized use of your computer.
You determine when the password is required within the BIOS Features Setup Menu and its Security option (see Section 3). If the Security option is set to "System", the password will be required both at boot and at entry to Setup. If set to "Setup", prompting only occurs when trying to enter Setup.
Section 5. Chipset Setup/Integrated Peripherals Features Setup
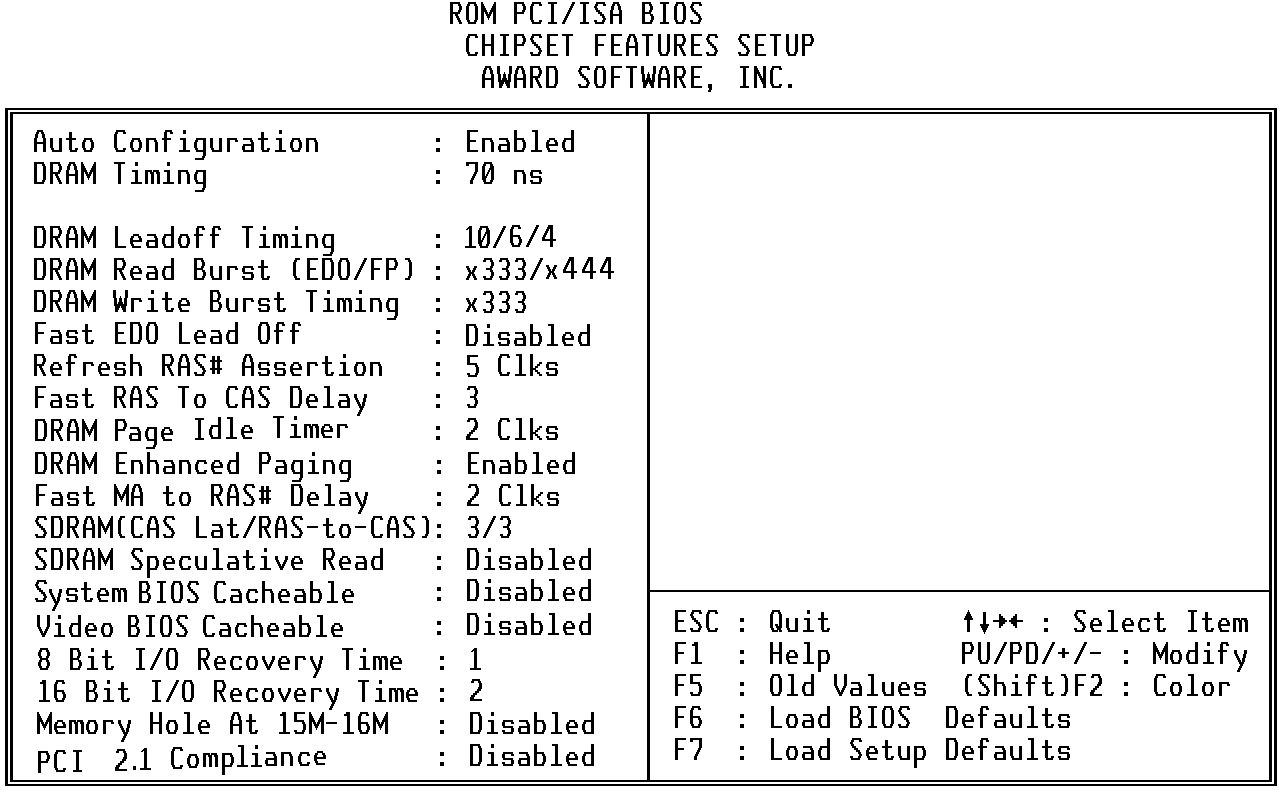
Pre-defined values for DRAM, cache timing according to CPU type & system clock.
The Choice: Enabled (default), Disabled.
Note: When this item is enabled, the pre-defined items will become SHOW- ONLY.
The DRAM timing is controlled by the DRAM Timing Registers. The timings programmed into this register are dependent on the system design. Slower rates may be required in certain system designs to support loose layouts or slower memory.
| 60ns | DRAM Timing Type. |
| 70ns | DRAM Timing Type. (default) |
This sets the number of CPU clocks allowed before reads and writes to DRAM are performed.
Choose : 11/7/3, 10/6/3, 11/7/4, 10/6/4
This sets the timing for burst mode reads from two different DRAM(EDO/FPM). Burst read and write requests are generated by the CPU in four separate parts. The first part provides the location within the DRAM where the read or write is to take place while the remaining three parts provide the actual data. The lower the timing numbers, the faster the system will address memory.
| x222/x333 | Read DRAM (EDO/FPM) timings are 2-2-2/3-3-3 |
| x333/x444 | Read DRAM (EDO/FPM) timings are 3-3-3/4-4-4 |
| x444/x444 | Read DRAM (EDO/FPM) timings are 4-4-4/4-4-4 |
This sets the timing for burst mode writes from DRAM. Burst read and write requests are generated by the CPU in four separate parts. The first part provides the location within the DRAM where the read or write is to take place while the remaining three parts provide the actual data. The lower the timing numbers, the faster the system will address memory.
| x222 | Write DRAM timings are 2-2-2-2 |
| x333 | Write DRAM timings are 3-3-3-3 |
| x444 | Write DRAM timings are 4-4-4-4 |
Fast EDO Lead Off
The item allows you to select the Fast EDO Lead Off or not to enhance the performance.
The Choice: Enabled, Disabled.
Refresh RAS# Assertion
This item allows you to select the type of DRAM refresh clock delay.
| 4,5Clks | The timing type. |
Fast RAS To CAS Delay
This field lets you insert a timing delay to get a faster performance between the Row Address Strobe (RAS) to Column Address Strobe (CAS) strobe signals, used when DRAM is written to, read from, or refreshed.
| 2,3 | The timing delay |
DRAM Page Idle Timer
This item allows you to select the type of DRAM Page Idle Timer delay.
| 2,4,6,8Clks | The timing type (default: 2 Clks) |
DRAM Enhanced Paging
This item allows you to determine whether to keep the page open until a page/row miss or use additional information to keep the DRAM page open when host may be "Light back".
The Choice: Enabled (default), Disabled.
Fast MA to RAS# Delay
This item allows you to select the DRAM Row Miss timing. Note: the timing adjustments are independent of DLT timing adjustment.
| 1 | One clock. (MA setup to RAS# assertion) |
| 2 | Two clocks. (default) |
SDRAM (CAS Lat / RAS -to-CAS)
This item allows you to select the CAS# latency for all SDRAM cycles and RAS# to CAS# delay.
| 2/2,3/3 | The timing type. (default:3/3) |
This item is capable of allowing a DRAM read request to be generated slightly before the address has been fully decoded. This can reduce all read latencies.
More simply, the CPU will issue a read request and included with this request is the place (address) in memory where the desired data is to be found. This request is received by the DRAM controller. When it is enabled, the controller will issue the read command slightly before it has finished determining the address.
The Choice: Enabled, Disabled (default).
System/Video BIOS Cacheable
Allow the System/Video BIOS to be cached to allow faster execution.
The Choice: Enabled, Disabled (default).
The recovery time is the length of time, measured in CPU clocks, which the system will delay after the completion of an input/output request. This delay takes place because the CPU is operating so much faster than the input/output bus that the CPU must be delayed to allow for the completion of the I/O.
This item allows you to determine the recovery time allowed for 8 bit I/O. Choices are from NA, 1 to 8 CPU clocks.
This item allows you to determine the recovery time allowed for 16 bit I/O. Choices are from NA, 1 to 4 CPU clocks.
In order to improve performance, certain space in memory can be reserved for ISA cards. This memory must be mapped into the memory space below 16 MB.
| Enabled | Memory hole supported. |
| Disabled | Memory hole not supported. (default) |
PCI 2.1 Compliance
| Enabled | With PCI 2.1 interface card. |
| Disabled | Normal PCI interface card. (default) |
Note : Most the PCI cards are for PCI V2.0.

Section 6. Integrated Peripherals
| Enabled | IDE controller uses block mode. (default) |
| Disabled | IDE controller uses standard mode. |
IDE hard drive controllers can support up to two separate hard drives. These drives have a master/slave relationship which are determined by the cabling configuration used to attach them to the controller. Your system supports two IDE controllers--a primary and a secondary--so you have to ability to install up to four separate hard disks.
PIO means Programmed Input/ Output. Rather than have the BIOS issue a series of commands to effect a transfer to or from the disk drive, PIO allows the BIOS to tell the controller what it wants and then let the controller and the CPU perform the complete task by themselves. This simpler and more efficient (and faster).
Your system supports five modes, numbered from 0 (default) to 4, which primarily differ in timing. When Auto is selected, the BIOS will select the best available mode. This is true for the next four setup items:
IDE Primary Master PIO
IDE Primary Slave PIO
IDE Secondary Master PIO
IDE Secondary Slave PIO
IDE UDMA
| Auto | Ultra DMA is auto detect. (default) |
| Disabled | Ultra DMA is Disabled. |
| Enabled | Primary HDD controller used. (default) |
| Disabled | Primary HDD controller not used. |
| Enabled | Secondary HDD controller used. (default) |
| Disabled | Secondary HDD controller not used. |
USB Keyboard Support
Choice are Enabled, Disabled. (default)
Onboard FDC Controller
Choices: Enabled (default), Disabled.
Onboard Serial Port 1/Port 2
Choices are 3F8/IRQ4, 2F8/IRQ3, 3E8/IRQ4, 2F8/IRQ3, Auto, Disabled.
UR 2 Mode
Port 1: (default:3F8/IRQ4), Port 2: (default:2F8/IRQ3)
Choices are Normal (default), IrDA, ASKIR.
UR2 Duplex Mode
This item allows you to select the IR function when your select the UART 2 Mode is ASKIR
Choices are Half, Full.
Use UART2 Pins
This item allows you to determine the active of RXD, TXD.
Choices are IR-RX2TX2, RXD2 TXD2
Note: The IR-RX2TX2 select IR or Uart2 only one in hardware
Onboard Parallel Port
This item allows you to determine access onboard parallel port controller with which I/O address.
Choices are 378H/IRQ7 (default), 278H/IRQ5, 3BCH/IRQ7, Disabled.
Parallel Port Mode
Select an operating mode for the onboard parallel (printer) port. Normal EPP (Extended Parallel Port) ECP (Extended Capabilities Port) ECP+EPP PC AT parallel port Bi-directional port Fast, buffered port Fast, buffered, bi-directional port.
Select Normal unless you are certain your hardware and software both support EPP or ECP mode.
Choices are PS/2, EPP1.9, ECP, ECPEPP1.9, SPP (default), EPP1.7, ECPEPP1.7
ECP Mode Use DMA
Select a DMA channel for the parallel port for use during ECP mode.
Choices are 3, 1.
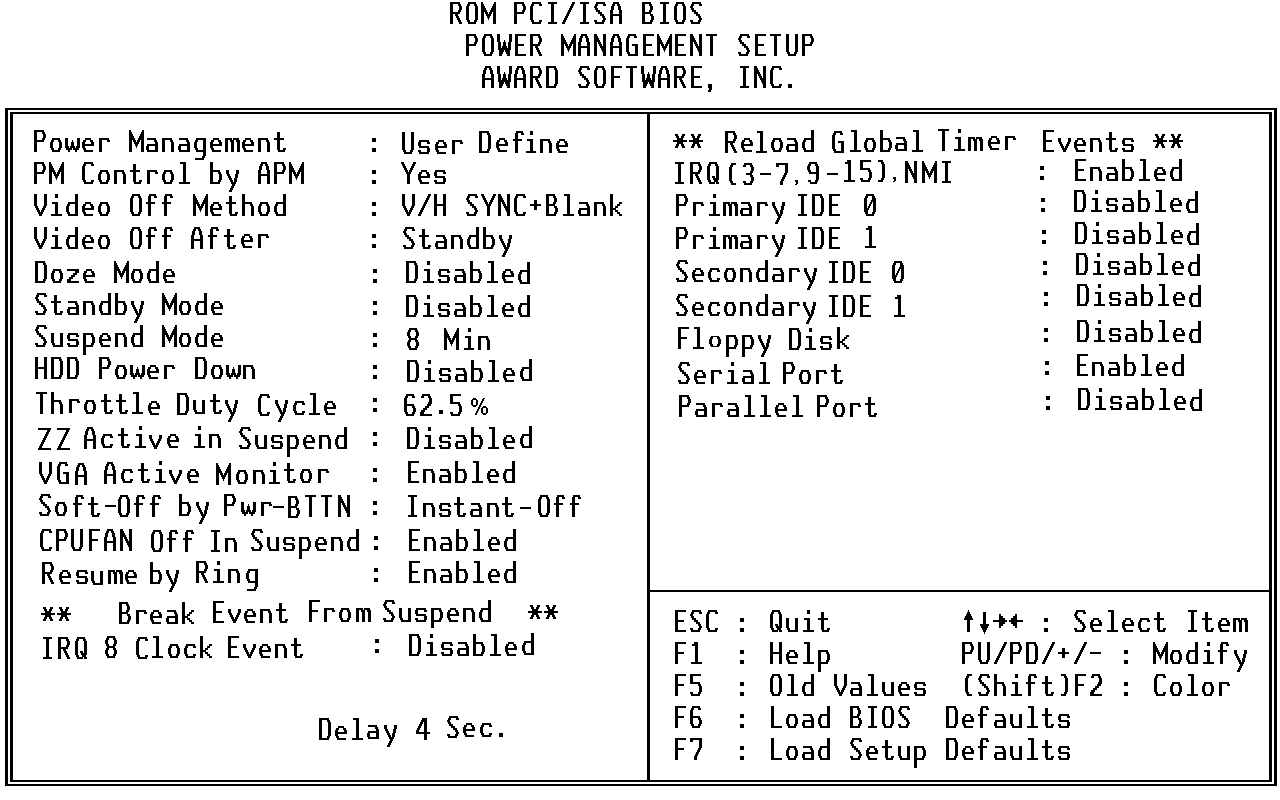
Section 7. Power Management Setup
This category allows you to select the type (or degree) of power saving and is directly related to the following modes:
1. Doze Mode
2. Standby Mode
3. Suspend Mode4
4. HDD Power Down
There are four selections for Power Management, three of which have fixed mode settings.
| Disable | No power management. Disables all four modes |
| Min. Power Saving | Minimum power management. Doze Mode = 1 hr. Standby Mode = 1 hr., Suspend Mode = 1 hr., and HDD Power Down = 15 min. |
| Max. Power Saving | Maximum power management -- ONLY AVAILABLE FOR SL CPU. Doze Mode = 1 min., Standby Mode = 1 min., Suspend Mode = 1 min., and HDD Power Down = 1 min. |
| User Define (default) | Allows you to set each mode individually. When not disabled, each of the ranges are from 1 min. to 1 hr. except for HDD Power Down which ranges from 1 min. to 15 min. and disable. |
When enabled, an Advanced Power Management device will be activated to enhance the Max. Power Saving mode and stop the CPU internal clock.
If the Max. Power Saving is not enabled, this will be preset to No.
This determines the manner in which the monitor is blanked.
| V/H SYNC+Blank (default) | This selection will cause the system to turn off the vertical and horizontal synchronization ports and write blanks to the video buffer. | |
| Blank Screen | This option only writes blanks to the video buffer. | |
| DPMS | Initial display power management signaling. | |
VIDEO Off After
This item determines the Video Off timer.
The choice: Suspend, Standby(default), Doze, N/A
The following four modes are Green PC power saving functions which are only user configurable when User Defined Power Management has been selected. See above for available selections.
When enabled and after the set time of system inactivity, the CPU clock will run at slower speed while all other devices still operate at full speed.
When enabled and after the set time of system inactivity, the fixed disk drive and the video would be shut off while all other devices still operate at full speed.
When enabled and after the set time of system inactivity, all devices except the CPU will be shut off.
When enabled and after the set time of system inactivity, the hard disk drive will be powered down while all other devices remain active.
The duty cycle for CPU clock thermal mode
The choice: 12.5%, 25.0%, 37.5%, 50.0%, 62.5%(default), 75.0%, 87.5%
ZZ Active in Suspend
SRAM ZZ mode for L2 power management during CPU Standby. The choice: Enabled, Disabled(default)
VGA Active Monitor
The choice: Enabled(default), Disabled
Soft-Off by PWR-BTTN
| Delay 4 Sec. | Shut-off the system must delay 4 second for PS-ON Button |
| Instant-Off (default) | Shut-off the system for one touch |
Note: "PS-ON" button is for ATX POWER only
CPUFAN Off In Suspend
Component name is FAN for CPU fan use. The fan is stop when Suspend mode is active. (default: Enabled)
Resume by Ring
The Ring signal into the MODEM, than the system is restart. (default: Enabled)
Break Event From Suspend
IRQ 8 Clock Event
The choice: Enabled, Disabled (default)
Reload Global Timer Events
Power Down and Resume events are I/O events whose occurrence can prevent the system from entering a power saving mode or can awaken the system from such a mode. In effect, the system remains alert for anything which occurs to a device which is configured as On, even when the system is in a power down
Section 8. PnP/PCI Configuration Setup
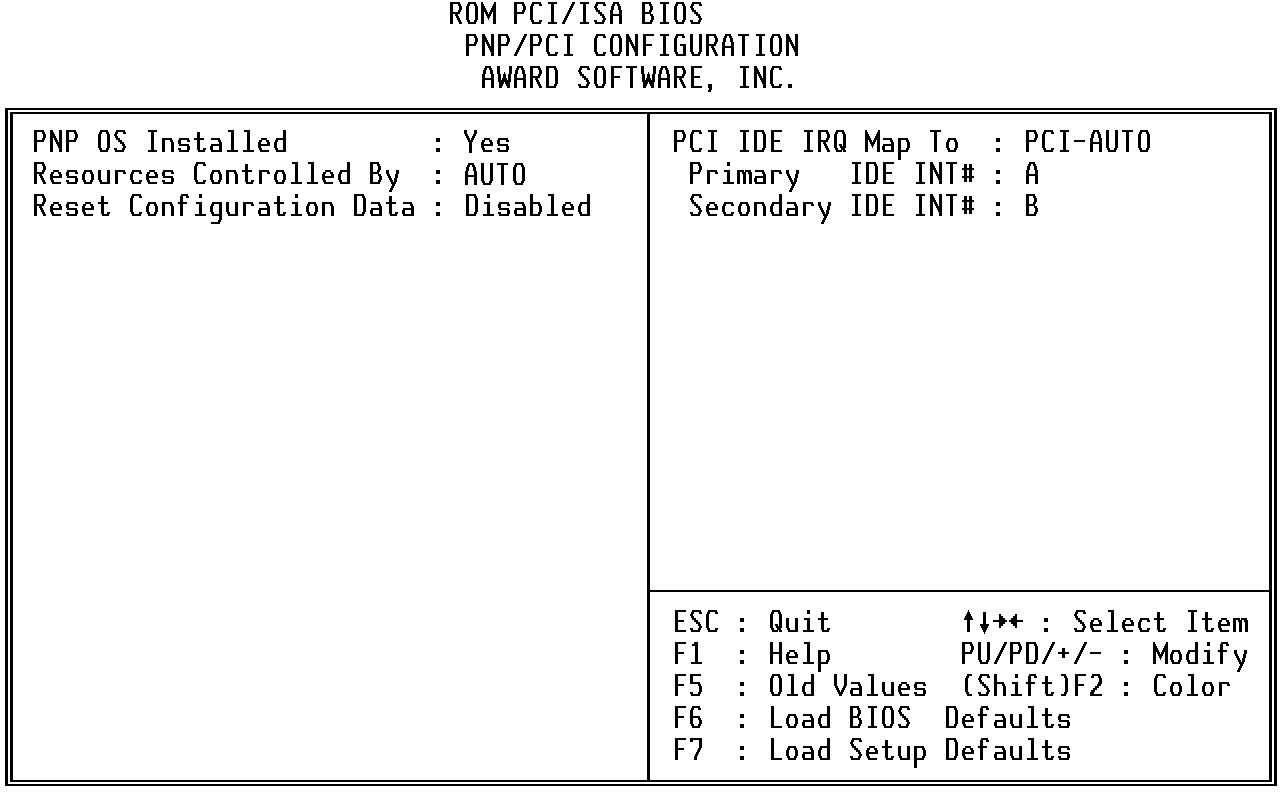
PNP OS Installed
This item allows you to determine install PnP OS or not.
Choices are Yes(default) and No.
The Award Plug and Play BIOS has the capacity to automatically configure all of the boot and Plug and Play compatible devices. However, this capability means absolutely nothing unless you are using a Plug and Play operating system such as Windowssymbol 226 \f "Symbol" \s 10â} 95.
Choices are Auto(default) and Manual.
This item allows you to determine reset the configuration data or not.
Choices are Enabled and Disabled(default).
IRQ3/4/5/7/9/10/11/12/14/15, DMA0/1/3/5/6/7 assigned to
This item allows you to determine the IRQ / DMA assigned to the ISA bus and is not available to any PCI slot.
Choices are Legacy ISA and PCI/ISA PnP.
PCI IDE IRQ Map to, Primary IDE INT#, Secondary IDE INT#
This allows you to configure your system to the type of IDE disk controller in use. By default, Setup assumes that your controller is an ISA (Industry Standard Architecture) device rather than a PCI controller. The more apparent difference is the type of slot being used.
If you have equipped your system with a PCI controller, changing this allows you to specify which slot has the controller and which PCI interrupt (A, B,C or D) is associated with the connected hard drives.
Remember that this setting refers to the hard disk drive itself, rather than individual partitions. Since each IDE controller supports two separate hard drives, you can select the INT# for each. Again, you will note that the primary has a lower interrupt than the secondary as described in "Slot x Using INT#" above.
Selecting "PCI Auto" allows the system to automatically determine how your IDE disk system is configured.
Used MEM base addr
This item allows you to determine which basic addresses do not be occupied by PCI Card and leave these addresses for some special ISA Card used only.
Choices are C800, CC00, D000, D400, D800, DC00.
Used MEM Length
This item determines the memory length of addresses which is for some special ISA Card used.
Choices are 8K, 16K , 32K, 64K.
Section 9. Low-Level Format Utility
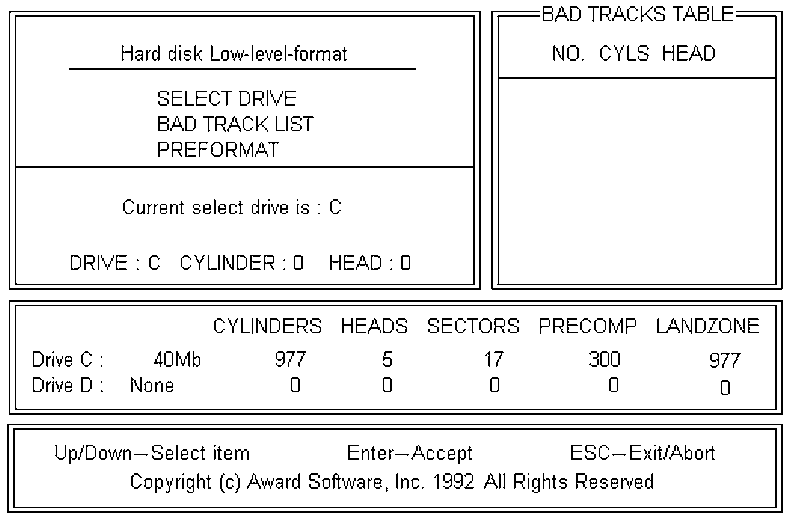
Select from installed hard disk drive C or D. Listed at the bottom of the screen is the drive automatically detected by the utility.
The utility will automatically scan bad tracks and list the bad tracks in the window at the right side of the screen.
Directly type in any information about known bad tracks in the window at the right side of the screen.
Modify information about the added bad tracks in the window at the right side of the screen.
Delete the added bad tracks in the window at the right side of the screen.
Clear the whole bad track list in the window at the right side of the screen.
PREFORMAT
Select the interleave number of the hard disk drive you wish to perform low level format. You may select from 1 to 8. Check the documentation that came with the drive for the correct interleave number, or select 0 for utility automatic detection.
This allows the utility to scan for bad sectors first then format by each track.
Press <Y> to start low level format.