 |

 IBM-AUSTRIA - PC-HW-Support 30 Aug 1999
 |
Preparing the Rack Enclosure
Preparing the Rack Enclosure:
In this section, you will use the following parts:
- Two slide bracket assemblies
- Two slide rails (fitted to system unit)
- One cable-management arm
- Ten long screws (M6 by 16 mm)
- Ten cage nuts
- Installation template
Attention To ensure cabinet stability, plan the installation of servers in the rack
enclosure starting from the bottom.
NOTE: This procedure requires two people.
To attach the mounting hardware to the rack enclosure:
- Mark the positions of the slide brackets on the mounting rails on the rack enclosure.
- Position the template on the front mounting rail on the rack enclosure, aligning the holes.
Secure the template in place with tape.
- Mark the holes for the slide brackets and cage nuts. If you prefer, mark all the cage nut
positions on the rack at this time.
- Carefully remove the tape from the mounting rails, and attach the template to the rear
mounting rails. Mark the locations for the slide brackets and cage nuts.
NOTE:
- You must align the slide brackets correctly, or the installation cannot be completed.
- The slide rails have four screws each to allow for length adjustment.
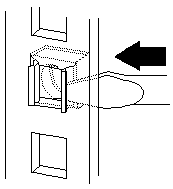
- Install the cage nuts in the marked positions as shown.
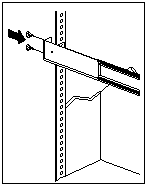
- Attach the slide rail to the left side of the rack enclosure.
- Extend the outer slide rail until the slide bracket is flush against the outside of the left front
mounting rail. Align the slide rail with the cage nuts on the mounting rail.
- From the front of the rack enclosure, insert two long screws through the slide bracket and
mounting rail. Press the slide bracket until it is flush with the outer edge of the mounting rail,
then, tighten the screws.
- Attach the slide bracket to the left rear side of the rack enclosure.
- Align the holes on the slide bracket with the cage nuts on the rear mounting rail.
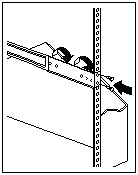
- From the rear of the rack enclosure, insert two long screws through the slide bracket
and mounting rail, then, tighten the screws.
- If it was necessary to adjust the length of the slide rails, tighten the nuts on the slide
rail, using pliers, a socket wrench, or an adjustable wrench.
- Attach the slide rail to the right side of the rack enclosure.
- Extend the outer slide rail until the slide bracket is flush against the outside of the right front
mounting rail. Align the slide bracket with the cage nuts on the mounting rail.
- From the front of the rack enclosure, insert two long screws through the slide bracket and
mounting rail. Press the slide rail so that it is flush with the outer edge of the mounting rail and
tighten the screws.
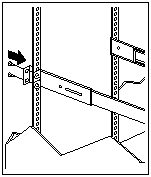
- Attach the slide bracket to the right rear of the rack enclosure.
- Align the holes on the bracket with the cage nuts on the rear mounting rail.
- From the rear of the rack enclosure, insert a long screw through holes in the slide
bracket and mounting rail, then, tighten the screws.
- If it was necessary to adjust the length of the slide rails, tighten the nuts on the slide
rail, using pliers, a socket wrench, or an adjustable wrench.
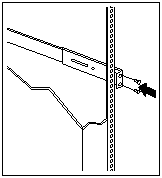
- Attach the cable-management arm to the right rear of the rack enclosure.
- Align the holes on the cable-management arm mounting panel with the cage nuts on the rear
mounting rail.
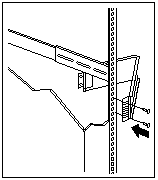
- From the rear of the rack enclosure, insert a long screw through the holes in the
cable-management arm mounting panel and cage nut, then, tighten the screws.
NOTE:
- You can choose to wait to attach the cable-management arm to the rack
until after you have attached the other end of the cable-management arm to the server.
- To facilitate alignment of the cable-management arm, be sure to insert the screws
through the first and fourth holes, as shown.
Back to 
More INFORMATION / HELP is available at the IBM-HelpCenter
Please see the LEGAL - Trademark notice.
Feel free - send a  for any BUG on this page found - Thank you.


 for any BUG on this page found - Thank you.